
A slow computer can make even simple tasks frustrating. Opening applications takes longer than expected, switching between browser tabs becomes difficult, and sometimes Windows takes several minutes to become usable after startup.
If you are using Windows 11, you might assume that your computer needs more RAM, a faster processor or a new SSD.
Sometimes, hardware really is the problem. However, unnecessary startup applications, limited storage space, background processes and poorly configured settings can also affect performance.
The good news is that Windows 11 includes several built-in tools that can help you improve your computer's responsiveness without installing additional optimization software.
In this guide, we'll explore eight practical settings you can change to make Windows 11 run more smoothly.
1. Disable Unnecessary Startup Applications
One common reason Windows computers take a long time to start is that too many applications launch automatically when you sign in.
Applications such as messaging clients, game launchers, cloud storage tools and other utilities may run in the background even when you don't need them.
These applications can consume memory and processor resources.
How to disable unnecessary startup applications:
-
Press
Ctrl + Shift + Escto open Task Manager. -
Select Startup apps from the left sidebar.
-
Review the applications listed.
-
Look at the Startup impact column.
-
Right-click applications you don't need immediately after startup.
-
Select Disable.
You can also manage startup applications through:
Settings → Apps → Startup
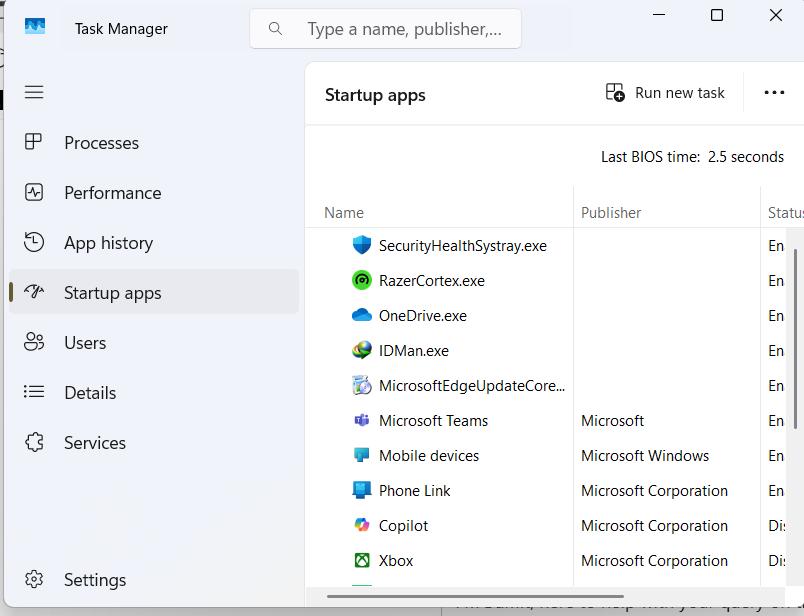
Disabling an application here does not uninstall it. You can still open it whenever you need it.
Tip: Avoid disabling security software, important hardware utilities or applications you rely on at startup. Focus on unnecessary applications with high startup impact.
2. Free Up Disk Space Using Storage Sense
Windows needs available storage space for temporary files, updates, application data and other system operations.
When your system drive becomes almost full, managing applications and updates can become more difficult.
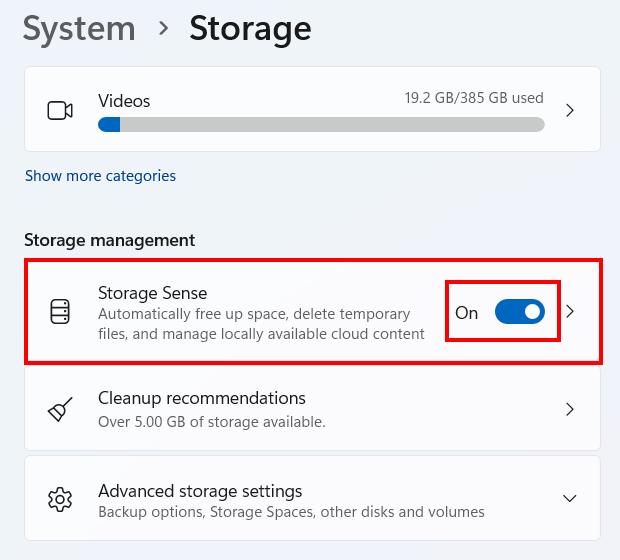
Windows 11 includes a feature called Storage Sense that can automatically remove certain unnecessary files.
How to enable Storage Sense:
-
Open Settings.
-
Select System.
-
Click Storage.
-
Find Storage Sense.
-
Turn it on.
-
Open its settings to configure when temporary files and Recycle Bin items should be cleaned.
You can also manually remove temporary files:
-
Open Settings → System → Storage.
-
Select Temporary files.
-
Review the categories.
-
Select files you are comfortable removing.
-
Click Remove files.
Be careful when selecting files. Review the Downloads folder and any previous Windows installation files before deleting them.
Tip: Keep enough free space on your Windows drive, especially if you use an SSD with limited capacity.
3. Uninstall Applications You No Longer Use
Over time, computers accumulate applications that are no longer needed.
Some applications install background services, automatic update processes or startup tasks. Removing software you no longer use can reduce unnecessary activity and free storage.
How to uninstall unused applications:
-
Open Settings.
-
Select Apps.
-
Click Installed apps.
-
Review the installed applications.
-
Find applications you no longer need.
-
Click the three-dot menu and select Uninstall.
Before removing an application, make sure you understand what it does.
Avoid uninstalling Windows components, hardware drivers or software required by your computer manufacturer.
4. Reduce Unnecessary Background Activity
Some applications continue running background processes even when you are not actively using them.
Depending on the application, this can consume memory, processor resources and network activity.
For supported applications, Windows 11 allows you to manage background permissions.
How to change background app permissions:
-
Open Settings.
-
Select Apps → Installed apps.
-
Find an application you want to manage.
-
Click its three-dot menu.
-
Select Advanced options, if available.
-
Find Background app permissions.
-
Change the setting to Never, where appropriate.
Not every application provides this setting. Desktop applications may manage their background activity independently.
Tip: Only restrict applications that don't need background activity. Messaging, synchronization and notification applications may need to run in the background to work correctly.
5. Adjust Windows Visual Effects for Better Performance
Windows 11 includes animations, transparency effects, shadows and other visual effects that make the interface look modern.
However, on computers with limited hardware resources, reducing some of these effects may make the interface feel more responsive.
How to adjust visual effects:
-
Open the Start menu.
-
Search for
Adjust the appearance and performance of Windows. -
Open the result.
-
Select the Visual Effects tab.
-
Choose Adjust for best performance.
-
Click Apply.
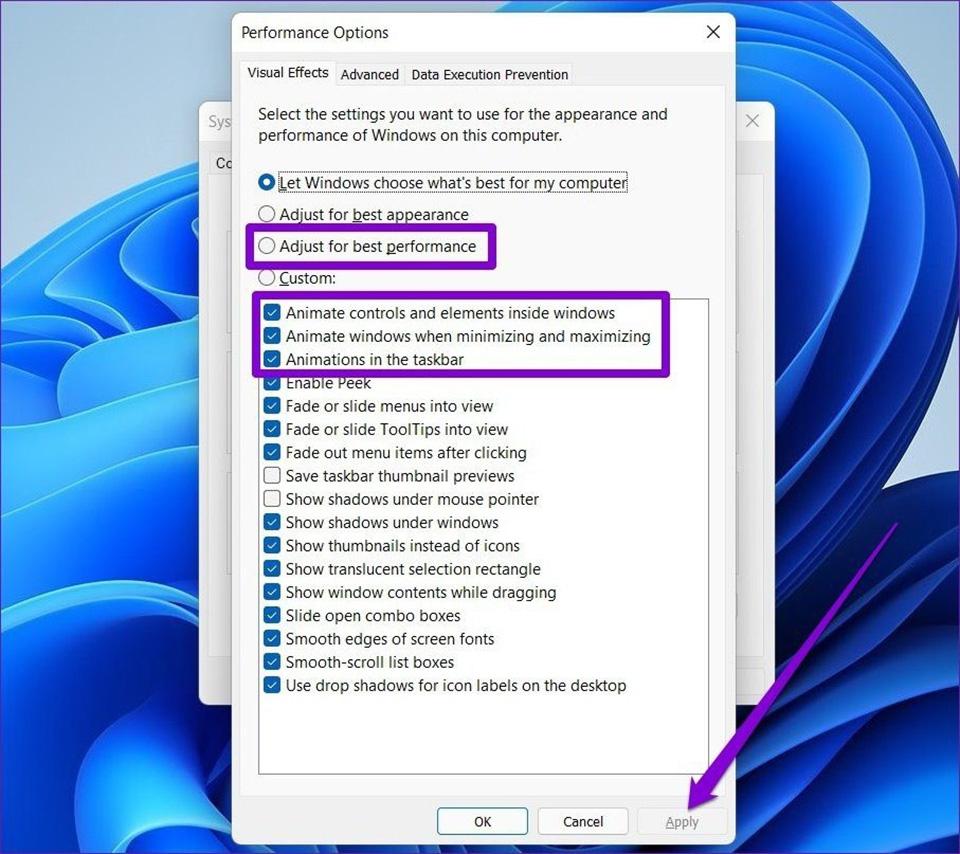
This disables several visual effects.
If you prefer to keep Windows looking attractive, you can choose Custom and disable only the effects you don't need.
For example, you might keep smooth edges of screen fonts while disabling unnecessary animations and shadows.
This is particularly useful on older computers, although the improvement depends on the graphics hardware and overall system performance.
6. Change Power Mode to Best Performance
Windows 11 allows you to choose how your computer balances performance and battery life.
The available modes generally include:
-
Best power efficiency
-
Balanced
-
Best performance
If your computer feels slow when running demanding applications, changing the power mode may help.
How to change power mode:
-
Open Settings.
-
Select System.
-
Click Power & battery.
-
Find Power mode.
-
Select Best performance when you need maximum performance.
Keep in mind that this setting can increase power consumption, battery drain and heat.
For laptops, Balanced is usually a sensible everyday choice. Use Best performance when you are plugged into power and need additional performance.
7. Keep Windows and Device Drivers Updated
Running outdated software can cause compatibility issues, bugs and performance problems.
Windows updates often include reliability improvements, security fixes and driver updates.
How to check for Windows updates:
-
Open Settings.
-
Select Windows Update.
-
Click Check for updates.
-
Install available updates.
-
Restart your computer if required.
You can also check optional driver updates under:
Windows Update → Advanced options → Optional updates
Only install drivers that are relevant to your hardware and obtained through trusted sources.
Avoid downloading random driver updater applications from unfamiliar websites.
A recent Windows performance improvement worth knowing about
On November 3, 2026, Microsoft announced additional Windows 11 memory and responsiveness improvements, with particular attention to computers with 8GB RAM.
Microsoft reported improvements in memory management, multitasking and everyday interactions. It also described changes to Windows components and applications to reduce unnecessary memory usage.
Microsoft's published performance figures are based on its own testing, so actual results can vary between computers.
To receive the announced improvements, Microsoft says eligible devices should be running Windows 11 version 26H2, build 26300.9818 or later, with the relevant Windows and application updates installed.
8. Find Out What Is Actually Slowing Down Your Computer
Instead of changing every Windows setting you can find, first identify which resources are under pressure.
Windows Task Manager provides a useful overview of CPU, memory, disk and network usage.
How to check resource usage:
-
Press
Ctrl + Shift + Esc. -
Open the Processes tab.
-
Review the CPU, Memory and Disk columns.
-
Identify applications consuming unusually high resources.
-
Close applications you are not using, if it is safe to do so.
-
Open the Performance tab for more detailed information.
For example:
-
High CPU usage may indicate a demanding application or background process.
-
High memory usage may mean too many applications or browser tabs are open.
-
High disk usage may indicate background updates, file operations or a slow storage device.
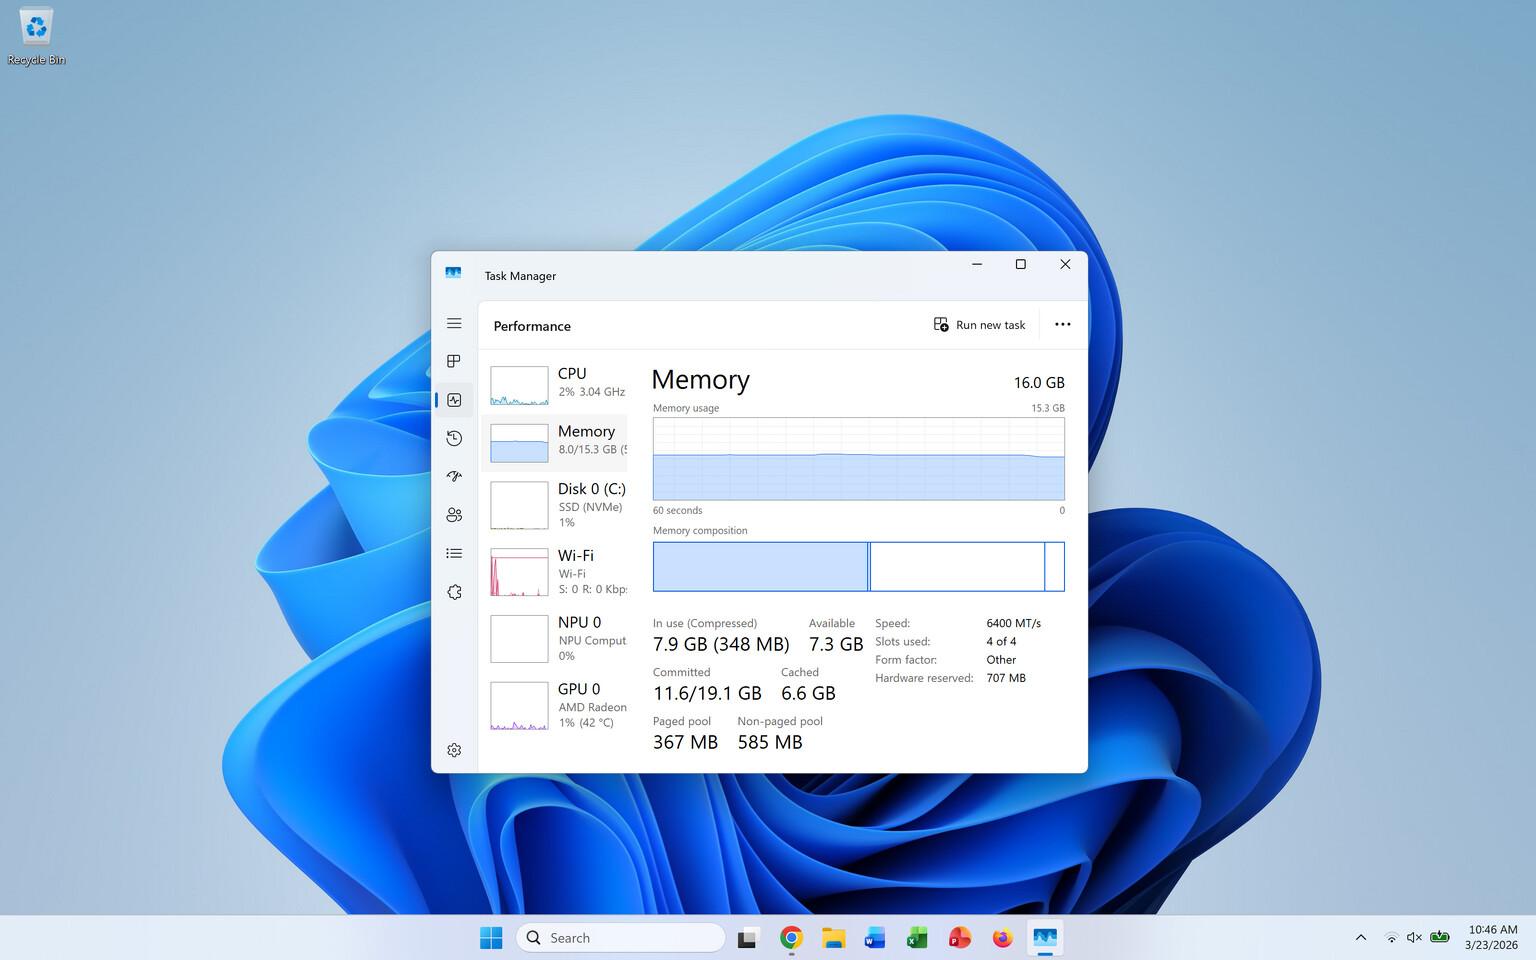
You should also consider running a Windows Security scan if you notice unusual processes or unexpected system behavior.
Go to:
Settings → Privacy & security → Windows Security → Virus & threat protection → Quick scan
Do not randomly terminate unfamiliar Windows processes. Some are essential for the operating system.
Bonus: Check Whether Your Hardware Is the Real Problem
Software optimization cannot solve every performance issue.
If your computer still feels slow after applying the changes above, the hardware may be limiting performance.
Here are three things worth checking.
RAM: Computers with 4GB or 8GB RAM can struggle when many applications are open simultaneously. For demanding multitasking, 16GB or more is generally a better target.
Storage: If your computer still uses a traditional hard disk drive (HDD), upgrading to an SSD can make a significant difference in startup time and application loading.
Processor: Older processors may struggle with demanding modern applications, even after Windows has been optimized.
You can check your computer's specifications by opening:
Settings → System → About
For more detailed information, open Task Manager and select Performance.
Final Thoughts
Making Windows 11 faster does not always require buying new hardware or installing expensive optimization applications.
Disabling unnecessary startup applications, cleaning temporary files, reducing background activity and monitoring resource usage can help improve everyday responsiveness.
However, remember that every computer is different. A change that helps an older laptop may make little difference on a newer computer with an SSD and sufficient RAM.
Start with the settings that address your actual problem, apply changes carefully and restart your computer when necessary.
The goal is not to disable everything in Windows. It is to make sure your computer spends its resources on the applications and tasks you actually use.
The conversation (0)
Different perspectives make better conversations. Keep it thoughtful.
Be the first to share a perspective.